Welcome at FreeTime Toys

Hello everybody and welcome here. This blog will be dedicated to the few toys projects I will do during my free time. You can expect some toys rehab, some design adaptation and some brand new design.

If you are here you probably know my taste for Jumbo Machinder, so most of my projects are related to those big guys. Hope you will enjoy it.

Sunday, March 31, 2013

Rokuron Q9 Version 2.0

When I did my first big replica, I got some help of a really talented 3D modeler because I was a bit rusty with my modeling skills back then.
The result was really nice but overall the model was not really accurate. It's a bit my fault as I should have maybe spend more time checking everything and comparing with the original.

Well, I was really happy anyway since the result was beyond my expectations, but since I've done other replica now and they're a bit more accurate I decided to see what I can do with Rokuron to have it a bit better.

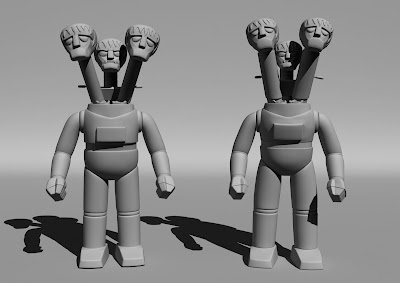
So here's a few image of the early modeling test. I've mainly  work on the heads, the body and the legs for the moment. But it already gives a good idea and it looks already much better.


One of the things that disturbed me a lot with the first one I did was the jaws, they were pointing a bit forward but on the original it actually backward. I think that I'm more or less there with the heads now.


Still a lot of things to adjust, the body is really far from perfect for the moment as the model is really with lots of faces, so maybe I will have to clean it a bit or spend lots of time on it to have it perfect.

Wednesday, March 27, 2013

Lenzari update

Things are moving slow due to a lot happening in my life. So, not much time to work on my little projects. But still I've been able to go back on the Lenzari modeling and here's a few images of the modeling in progress.

A few details have been improved since last time on the visible modeling. Adjusting a few proportions and details. But I've mainly spend my time working on the technical modeling of it. Making the wall tickness and the connections between the different parts.
The main difference on that one compare to Garada and Green Ghost is that he don't have a separate pelvis and the head is separate from the body. I've use more or less the same technique to connect the arms, except that this time the little pegs are on the arms and not the body. And I've also  use the same stuff for the head and the hand with the gigantic missile launcher. This way I don't need to glue them and they will be a bit articulated.

For the legs I've use a simple connection as I'm planning to glue them, it's way better for stability and since the connection is 45% almost, it's a bit silly if you bend them anyway.


I still have to finalize the wall thickness on the head and connect all the pieces together properly as for the moment there's a lot of different parts just put like that together. Will have to clean that so it will print perfectly.

One of the things that I need to focus know is also the grainy surface of the body and some parts of the head. I'm pretty sure that it's impossible to get something like that with the 3D printer, mainly because of the print layers and how to clean them after. I will probably make a quick print test to be sure. But for the moment the idea is to print it smooth and put a thin layer of magic sculpt on it and create the grainy surface like that. It looks like a good plan but I will have to test that as well. And that's for next time.