Welcome at FreeTime Toys

Hello everybody and welcome here. This blog will be dedicated to the few toys projects I will do during my free time. You can expect some toys rehab, some design adaptation and some brand new design.

If you are here you probably know my taste for Jumbo Machinder, so most of my projects are related to those big guys. Hope you will enjoy it.

Monday, June 25, 2012

Garada K7 final images

So, it's done, here's the final chapter of this long long project. I've done the final details on my replica and he's exactly like I wanted him to be.

Here's a long serie of images in a better quality than that funky vintage look picture. I've almost recreate the effect of the MIB and the pleasure to open it and take it our of the box (ok I've put it there first but who cares :)))

Oh and I swear, no more picture of Garada now, only new projects and he's not involve in it. I can close my fascination door in my brain.


Hope you've enjoy following this project and hope to make more in the future, thanks for all the support from everybody.

Thursday, June 21, 2012

Garada K7 is here.....

Finally finish, here's a vintage pict of it just for fun.
More to come in a few days once I have time to take decent pictures.


Tuesday, June 19, 2012

Work In Progress on the paint

It's good to finally see some colors on that guy. Here's the first images of the painting process, just for my fellow followers , still a few details on the head to add and the varnish to fix everything. Thursday evening it should be dry, I will also get all the metallic parts for the launcher and the spring.

I'm quite happy with the colors, as usual it was a nightmare to try to get the right one and I think that even if it's not 100% accurate, the look is there.

Here's two picts of the members during the paint in the paint cabin. The guy helping for the paint is really talented and all parts are just perfect.


And here's two images of the big guy put together for a check. Just need to finalize the lines on the mouth and the dark red on the eyes.
Still hesitating about doing the stickers on the sickles, I will see once it's finish.


Next post will be the final version with everything, and maybe a little video is things are going as plan :))))

Sunday, June 17, 2012

Rivets and cleaning

The end is closer and closer.

All the rivets are done now, each piece is clean and ready for paint and normally the paint is schedule to start tomorrow. So this is probably one of the last post before the completition of this project.

Here's a few picts with the rivets, it's hard to see of course as the material is quite translucent and those little details are hard to get.
Always tricky to do those rivets since once you touch the surface with the driller, you can't really do anything but drill. Each touch is a rivet and even if I've trace everything before, there's still a few stuff here and there that are not aligned, but I don't really mind as it's probably even more off on the real one.

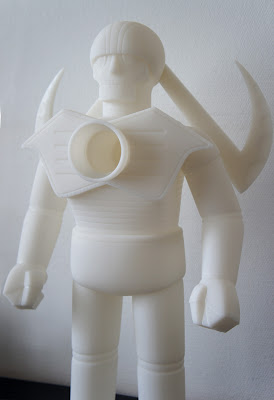
Ok ok it's another batch of white Garada in front on a white wall, but since he's spending almost all the time in a box is separate pieces, each time I put it together for a check, I can't stop staring at him and take pictures.

I know, you don't really see the rivets here, but this guy is so hypnotic...


Here's a few in high resolution, those tiny rivets are visible.


A few more just for pleasure


And a last one because it's not just always against a white wall. This was drying time after a big wash to remove all the dust from sanding and drilling and to prepare the surface for paintng.


It's the first time the two prints are united again since the print. The other one was sanded and prepared by my friend as I'm not crazy enough to spend double time on the sanding.

It's going to be hard to sleep tonight, tomorrow at 7am I'm on the road for the painting. Can't wait to have that guy finally over.

See you soon for the final chapter.

Wednesday, June 6, 2012

Frankenrada

Here's the begining of the next step: the rivets.
On my previous big project, the Rokuron Q9, I've drill all the rivets a bit freestyle and it ended quite well, but there a tiny details that I didn't like. Like on one leg a set of rivets was slightly higher than on the other one.

So for this project I've decide to fist trace everything before drilling.
It's really hard to say on the pict but I have the impression the the space between the rivets is a bit too big. I guess that I will have to spend hours in front of all the reference images I have and compare with my placement. But it's hard to evaluate that on those picts. Of course it doesn't need to be super accurate, but I would like to be as close as possible.

Here's the picts, at one point it reminded me of Frankenstein with all his little marks on the connections.


The fingers looks correct, I have more a doubt for the feet, maybe the rivets needs to be more close to the edge, and with less spacing between them.