
This is another chapter in my quest for the perfect Lenzari replica.
So, after trying to do the grainy surface on the 3D model I had to test it with a 3D printer to see how it will come out.
I was not really sure about all this and if the printer I've use in the past for the big size stuff will have enough resolution to print that grain.
After a few exchanges with the great support team of i.materialise, I wanted to test two printers: their regular SLA printer and the Connex from Objet.
On paper the Objet is really more accurate and seems to be a good choice. But this service is only available with the Vero White material of the Objet printer. Since I had some good results in the past with my mini vilains I wanted to try it also for this test.
The only problem thing that I was afraid and who might stop me is that I can't sand my pieces to get them perfectly smooth since the idea is to have a grain and if I sand them, it's going to remove the grain.
Here's a few images of the raw prints.
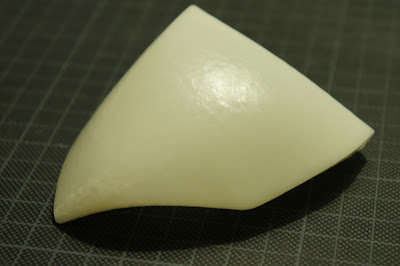
Those first images are from the Objet printer and as you can see it's really hard to judge the level of detail. It's actually one of the problem for me of this material, the light is really passing trough and it's hard to see the surface quality.


As you can see it's just one small part of the body but it's enough for this test and already quite expensive.
This second serie of images is from their SLA printer with the material called "paintable resin". As you can see, the surface looks pretty nice and regular and the grain is visible and the print layers not that much.

It's also a bit hard to judge the print quality so the best way to check all this was to put a primer coat on both test pieces.
I wanted to be sure that the primer will stick perfectly so I decided to sand each piece smoothly with a 600 grid sand paper. Just to prepare a tiny bit the surface. And I've also do a quick sanding with a 1200 grid.
IAfter that, I've put two coats of primer and here's the result:

The Objet print is on the left and the print layers are highly visible, the surface quality is far from perfect. And on the right, it's the SLA print, almost the challenger for me on that one and the result is really nice. The print layers are almost invisble, the grain comes out great.
There's no comparaison possible here, it's a total no match.
And as you can see, the primer is really going well on the surface, so the "paintable resin" is really the perfect name for this material.
Here's other close up pictures of each pieces.


It was really a good plan to make this test as I was able also to see how my grain will come out and that I needed to refine it a bit to be more close to the original. The level of details is really nice and I'm sure that I can have something that will look close enough to the original.
Now I need to finalize all the model with the new grain, I've also decide to add some grain on the knees and elbows parts as it seems that there's a tiny bit there also.
And also a very big check on all the connections parts as the modeling of the grain tends to shift a bit the whole surface.
That's a bit it for today's post. A bit technical but it's good to have some behind the scene stuff like this also.
So, after trying to do the grainy surface on the 3D model I had to test it with a 3D printer to see how it will come out.
I was not really sure about all this and if the printer I've use in the past for the big size stuff will have enough resolution to print that grain.
After a few exchanges with the great support team of i.materialise, I wanted to test two printers: their regular SLA printer and the Connex from Objet.
On paper the Objet is really more accurate and seems to be a good choice. But this service is only available with the Vero White material of the Objet printer. Since I had some good results in the past with my mini vilains I wanted to try it also for this test.
The only problem thing that I was afraid and who might stop me is that I can't sand my pieces to get them perfectly smooth since the idea is to have a grain and if I sand them, it's going to remove the grain.
Here's a few images of the raw prints.
Those first images are from the Objet printer and as you can see it's really hard to judge the level of detail. It's actually one of the problem for me of this material, the light is really passing trough and it's hard to see the surface quality.


As you can see it's just one small part of the body but it's enough for this test and already quite expensive.
This second serie of images is from their SLA printer with the material called "paintable resin". As you can see, the surface looks pretty nice and regular and the grain is visible and the print layers not that much.


It's also a bit hard to judge the print quality so the best way to check all this was to put a primer coat on both test pieces.
I wanted to be sure that the primer will stick perfectly so I decided to sand each piece smoothly with a 600 grid sand paper. Just to prepare a tiny bit the surface. And I've also do a quick sanding with a 1200 grid.
IAfter that, I've put two coats of primer and here's the result:

The Objet print is on the left and the print layers are highly visible, the surface quality is far from perfect. And on the right, it's the SLA print, almost the challenger for me on that one and the result is really nice. The print layers are almost invisble, the grain comes out great.
There's no comparaison possible here, it's a total no match.
And as you can see, the primer is really going well on the surface, so the "paintable resin" is really the perfect name for this material.
Here's other close up pictures of each pieces.


Now I need to finalize all the model with the new grain, I've also decide to add some grain on the knees and elbows parts as it seems that there's a tiny bit there also.
And also a very big check on all the connections parts as the modeling of the grain tends to shift a bit the whole surface.
That's a bit it for today's post. A bit technical but it's good to have some behind the scene stuff like this also.
Great to see that you've got the texture working on the CAD side *and* on the printing side, Mike!
ReplyDelete