Why did I show you my first project with the Rokuron Q9?. Well simply because I was working on a smaller version of it. If you don't have room to collect Jumbo Machinder, you can collect this smaller version or even the tiny version. The tiny one was really just for fun but it turned out also great.
The idea behind this is to try to reduce the cost and be able to produce print a few stuff. 3D print is still expensive and printing a full sized Machinder is hard for the wallet. And it's also pretty funny to see a Q9 that size :))
Here's a bad pict of them, more to come once they will be painted.
Welcome at FreeTime Toys
Hello everybody and welcome here. This blog will be dedicated to the few toys projects I will do during my free time. You can expect some toys rehab, some design adaptation and some brand new design.
If you are here you probably know my taste for Jumbo Machinder, so most of my projects are related to those big guys. Hope you will enjoy it.Tuesday, March 29, 2011
Light set up test
On the last post with the Double Spazer, I've manage to do a little light set up that worked more or less ok with the Grendizer on the picture.
I've decide to do a little render test of my Boba Fett in the same set up and see how it goes. At the end, the light seems to match but I have a lot of work to do to improve the shading. Plastics doesn't react like the original one. But this could, clearly be a good test scene to set up things later, and it's fun to see them next to a real Machinder.
Sunday, March 27, 2011
Double Spazer Machinderized
Here's a little update of this project. I had interesting feedback from some friends like it was not enough "Machinder" style. It's true that I've had the little SOC double spazer next to me to check for the modeling, so maybe it was a little bit too close to the SOC at the end.
So I've change a bit the texture to make it look more like the Spazer little brother. It's maybe even not enough but it gives a better feeling I think.
Here it is:
So I've change a bit the texture to make it look more like the Spazer little brother. It's maybe even not enough but it gives a better feeling I think.
Here it is:
Saturday, March 26, 2011
Jumbo Double Spazer
Hello everybody.
After a big rush at work, I finally had some time to work on this thing. It's something I had in my mind for a long time now and wanted to visualize it a bit. There was the jet pilder for the Mazinger Z jumbo, why not give Grendizer a back pack also? :))
This was modeled quite fast just to have an idea of proportions. Maybe one day I will optimize it for a 3D print and make it real. Problem might be the weight of it if you stick it to Grendizer's back.
Anyway; enjoy ;)
After a big rush at work, I finally had some time to work on this thing. It's something I had in my mind for a long time now and wanted to visualize it a bit. There was the jet pilder for the Mazinger Z jumbo, why not give Grendizer a back pack also? :))
This was modeled quite fast just to have an idea of proportions. Maybe one day I will optimize it for a 3D print and make it real. Problem might be the weight of it if you stick it to Grendizer's back.
Anyway; enjoy ;)
Friday, March 4, 2011
Rokuron, the first project
So this is old news for a lot of you as this was my really first big project.
Maybe I should have started my blog with this one, but since it was described in a Brog at TBDX a long time ago I've skip it. Then as the whole idea here is to display all my project I was thinking it can be interesting to show it also as it was my first experience with 3D printers and the opening of interesting perspective and ideas.
For that project I had a huge help on the modeling, when I first had the idea of doing something like that I was not sure to be able to model it myself properly as I had not model anything for a long long time. Since then I've put my modeling skills up to date and I take a lot of pleasure to do it.
The idea was to test the 3D print process with something interesting. And as you can see it turned out great. A bit expensive at the end so a bit frustrating as you have to choose witch project will go until this stage.
But I've learn a lot with it and as I said before, a lot of new perspective for me because of this project.
You can read the original post here with the full story :http://toyboxdx.com/brog/?p=3020
And here's some picts side by side with an original. As you can see, and as usual with me now, this is not 100% accurate, the original is more rounded on the hips, the jaws are going to much to the front on mine. But the overall feeling is pretty cool and I can say that each time I'm looking at it, well I just love him like that.
Maybe I should have started my blog with this one, but since it was described in a Brog at TBDX a long time ago I've skip it. Then as the whole idea here is to display all my project I was thinking it can be interesting to show it also as it was my first experience with 3D printers and the opening of interesting perspective and ideas.
For that project I had a huge help on the modeling, when I first had the idea of doing something like that I was not sure to be able to model it myself properly as I had not model anything for a long long time. Since then I've put my modeling skills up to date and I take a lot of pleasure to do it.
The idea was to test the 3D print process with something interesting. And as you can see it turned out great. A bit expensive at the end so a bit frustrating as you have to choose witch project will go until this stage.
But I've learn a lot with it and as I said before, a lot of new perspective for me because of this project.
You can read the original post here with the full story :http://toyboxdx.com/brog/?p=3020
And here's some picts side by side with an original. As you can see, and as usual with me now, this is not 100% accurate, the original is more rounded on the hips, the jaws are going to much to the front on mine. But the overall feeling is pretty cool and I can say that each time I'm looking at it, well I just love him like that.
As you can see also, I've re-use a lot of the modeling to do the Black Ox design, which was also the idea then, so that it looks like a real part of the line. But I really want to try to make a hero character much more like original Hero Machinders but I need more freetime for that :))
Monday, February 21, 2011
Daltanious rehab: the end
So, after a little rush on the MB cars, I was able to finalize my work on the Daltanious head.
The paint turned out to be a real nightmare. Even if it look nice on the picts, I can describe the painting as : wrong choices all the time.... I don't have an airbrush so I generally use spray paint and a specific brand. I've decide to go for a cheaper one and this was the first wrong choice, this paint was really heavy and I've lost a lot of details, so lots of sanding between all layers of paint to be sure to keep as much details as possible.
Then I've decide to try something to mask all the different parts. Instead of using masking tape, I wanted to test plastiline thinking that using a soft material like that can be easy. Well the plastiline was pretty soft and it was really hard to get it properly everywhere. After the full painting and removing the plastiline I had to do a lot of little touch up.
Hopefully the varnish has soften all the little imperfections and the global look is quite nice.
Because of the whole process used, I don't have a paint like the original, It doesn't look too mcuh hand painted like the original one and the brown is a little less red than on the original. In a certain way it's cool as it's not a full replica but my own revised version.
In conclusion: next time I'll buy an airbrush and do it like it should be done and not with those paint spray :))
Here's a few pictures of this big guy back to life.
The paint turned out to be a real nightmare. Even if it look nice on the picts, I can describe the painting as : wrong choices all the time.... I don't have an airbrush so I generally use spray paint and a specific brand. I've decide to go for a cheaper one and this was the first wrong choice, this paint was really heavy and I've lost a lot of details, so lots of sanding between all layers of paint to be sure to keep as much details as possible.
Then I've decide to try something to mask all the different parts. Instead of using masking tape, I wanted to test plastiline thinking that using a soft material like that can be easy. Well the plastiline was pretty soft and it was really hard to get it properly everywhere. After the full painting and removing the plastiline I had to do a lot of little touch up.
Hopefully the varnish has soften all the little imperfections and the global look is quite nice.
Because of the whole process used, I don't have a paint like the original, It doesn't look too mcuh hand painted like the original one and the brown is a little less red than on the original. In a certain way it's cool as it's not a full replica but my own revised version.
In conclusion: next time I'll buy an airbrush and do it like it should be done and not with those paint spray :))
Here's a few pictures of this big guy back to life.
First a bit of darkness
with some lights
And finally a little side by side with a pict from the original auction.
Monday, February 7, 2011
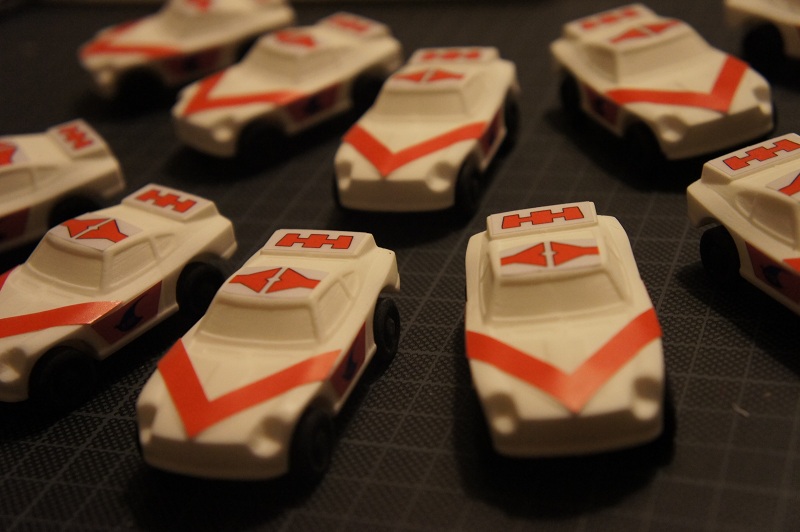
Mach Baron repro car, almost there.
I was finally able to finish the first serie of 10 little cars. I need to improve my casting skills as I've had a lot of junk cast before having the first 10 good looking one.
Here's a few picts. If you are interested, don't hesitate to contact me: mikedeco@gmail.com
Wednesday, February 2, 2011
Daltanious rehab
Here's a little work in progress on a Robot Factory Daltanious rehab. I saw one on auctions that was missing his lion head on the chest, some stickers were missing also. It sounded like a good challenge for me to try to make him look proud again. How to replicate the head when you don't have access to a real one? Well you do it in 3D and then you print it in stereolythography. A good friend and fellow collector send me some pictures from his lion head and also some measure and I was able to do something quite close to the real one.
I still need to finalize this thing as it's in stand by for the moment because I focus more on the Mach Baron car.
You will see it here once it's finish. Hope in two weeks or something.
I still need to finalize this thing as it's in stand by for the moment because I focus more on the Mach Baron car.
You will see it here once it's finish. Hope in two weeks or something.
Here's the first images of the 3D model
And with some colors to have a better idea
And here's the 3D print without any post process yet
Sunday, January 30, 2011
Boba Fettchinder
This is something new for most of you but in fact this was my second big project. The first one was my Rokuron Q9 for wich I had some help with the 3D modeling. When I saw the Super Shogun Stormtrooper I wanted to do some modeling and design test to "undust" my modeling skills since I'm doing more animation rather than modeling or shading and lighting.
I also wanted to see a bit how I can transpose a character into a Jumbo Machinder and try to keep the spirit of both. I've try to bring some little details from existing machinder into it so that it looks like a real Machinder.
I've include also a little movie I did with the first version of modeling. You can see at the begining how I came up with global proprtions, using pieces of several machinder and assemble them in photoshop.
For those of you who might think that this can be images of the upcoming Super Shogun Boba Fett made by a famous independant toy company, well it's not. It just something I did for fun and that's all.
I've done some new rendering of it to play a bit with a render engine but I still have a lot of work to do on that part.
I also wanted to see a bit how I can transpose a character into a Jumbo Machinder and try to keep the spirit of both. I've try to bring some little details from existing machinder into it so that it looks like a real Machinder.
I've include also a little movie I did with the first version of modeling. You can see at the begining how I came up with global proprtions, using pieces of several machinder and assemble them in photoshop.
For those of you who might think that this can be images of the upcoming Super Shogun Boba Fett made by a famous independant toy company, well it's not. It just something I did for fun and that's all.
I've done some new rendering of it to play a bit with a render engine but I still have a lot of work to do on that part.
Let's start with the video
And now some render I've done more recently
And some color tests
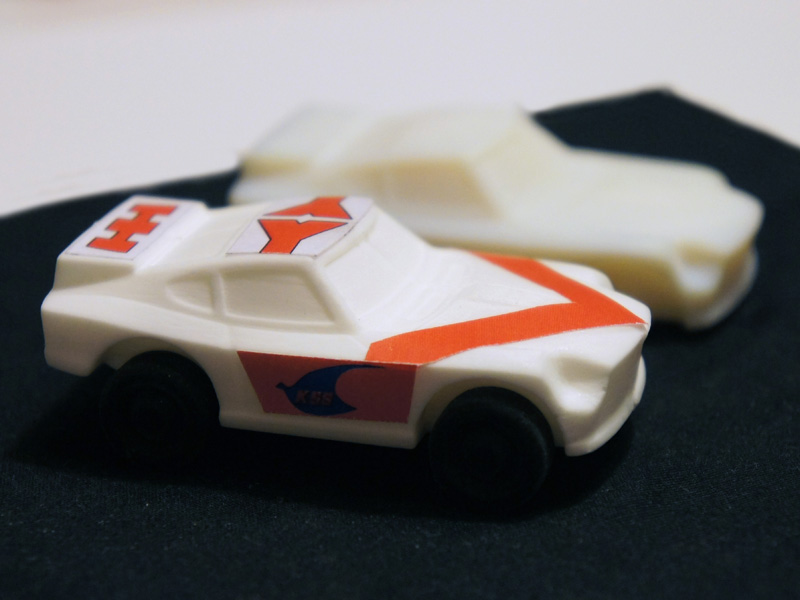
First cast of the Mach Baron car
Finally had the time to finalize the mold based on the second prototype and I've done the first cast of the repro car.
It needs some cleaning and I need to adjust a bit the stickers as they were made for the previous prototype wich was a bit smaller than the new one.
Just need to put it in Mach Baron foot now :))
The one with the stickers is the first cast and the other one is the second prototype.
It needs some cleaning and I need to adjust a bit the stickers as they were made for the previous prototype wich was a bit smaller than the new one.
Just need to put it in Mach Baron foot now :))
The one with the stickers is the first cast and the other one is the second prototype.
It's hard to get something without blur as the model is quite small this car is around 6.5 centimeter long.
Subscribe to:
Posts (Atom)