Welcome at FreeTime Toys

Hello everybody and welcome here. This blog will be dedicated to the few toys projects I will do during my free time. You can expect some toys rehab, some design adaptation and some brand new design.

If you are here you probably know my taste for Jumbo Machinder, so most of my projects are related to those big guys. Hope you will enjoy it.

Wednesday, December 26, 2012

The Missing Shield

First of all, let me wish you all the best for this end of year, and hope you will be able to spend some really good time with all the people you love.

I've been able to get a Spartan K5 recently, thanks to an old collector who decided to sell it to me. I've been looking for that guy for a very long time and even if it's considered like the easiest to get in the Villains, I don't know why but it always escaped me. I've never lost so many auctions for a specific Jumbo.

Unfortunately the one I was able to get is missing his shield, has a broken launcher and of course the spear is missing. But since a very good friend have one more complete, with the launcher and with the shield, I decided to go for it and try to make a replica of the shield.

But this time no use of high tech tools like 3D printing, back to the old school stuff: silicone and resin, and to add some challenge here, one big constraint: I'm not allowed to remove the original shield from the one of my friend as we don't want to take any risks to brake it or damage it.

So what I've done is put his Spartan in a big box, fill of old t-shirt, with the arm in the air and the shield slightly above the box. Once the Spartan was secure, I've put some wooden sticks under the shield and some rigid platform so that the pressure of the weight will be spread all around the back of the shield and not on the connection part with the arm.
So here's a picture of this weird setup


You have to imagine there's a little Spartan laying in that box :))
I've also put some plastiline to secure everything and be sure that the silicone won't go anywhere.
Once it was done, I've put some silicone layer by layer, with a thin coat first and it was thickened  a bit after.
Here's a close up of that first coat.


I've been a bit lazy for the picture of the steps after, but basically it was just four layers of silicone and then I've make a mother mold with some fiber plastic to keep the shape of the silicone perfect once it's out of the real shield.
Big stress was that I've realize that silicone is highly sensitive to temperature, and it's supposed to cure around 23°C, problem is that the room I was doing this was only around 18°C which slower the curing time a lot. First I was really confuse as I was thinking that I didn't mix properly the good ratios. But I've just realize that it was curing but 6 times slower than it should be.
Anyway, at the end the silicone mold is great and I've manage to do a first cast test to see how it looks and here's a shot of it.


The idea will be to create second mold for the back part that I can put on top of that one so that way I will be able to make rotational casting of my resin.
But because of the constrain that I can't remove the original shield from the arm of Spartan, I'm not able to mold the back of the shield and there's the connection part there.
So, a bit of 3D modeling and now I'm waiting for the 3D print of that piece that I will be able to glue on the flat back of the shield before doing the second part silicone mold. A bit tricky to explain but I think I know where I'm going with that.

With the end of year celebrations, everything goes a bit slow so I should get the 3D print in two weeks. And while I was ordering that part, I've also place an order for the spear and a launcher model. I will probably use the launcher like that and just paint it, and for the spear, I will certainly make a mold to cast it hollow and brown like the originals.

Well, this conclude the last post of this year. Thanks a lot to the few people reading this blog, and hope to be able to bring you some cool stuff next year.

Take care.


Wednesday, November 28, 2012

Lenzari Render test, or The Return Of The Boots

What surprised me with all those Kamen Rider villains is their boots, I've probably already say that, but they're just too funky with their little boots.

Ok so here's a render test to have an idea, I've work on the launcher and adjust a few things here and there. The most tricky part for this replica will clearly be the torso. There's some kind of grainy texture on it and it's going to be impossible to do that with 3D printing. I will have to go for a smooth surface and then add a super fine layer of milliput or something like that and create the grainy texture after. I still need to find something that match the grain to create that effect.

And one thing I'm really enthusiast about is the stickers in the eyes, I've always wanted to make one with stickers, ok ok it's just a small detail but it really gives the soul of the character.


Before going further with that one and do all the technical modeling to prepare for 3D printing, I might have to make a quick side project to restore another bad guy, but nothing is sure yet, so we will see.

Monday, November 26, 2012

Lenzari Modeling in Progress

Well, life was really busy lately, but finally got some time to start on the modeling of my next Jumbo replica: Lenzari. One of the hardest to find and the rarest of the Kamen Rider villains. So I've decide to give him the same treatment and replicate that guy.

There's a few tricky parts and for my other replica I was able to use some parts from one to another with a little bit of adjustment. I've been able to use the boots from the leg of Hasami Jaguar, but it's not exactly the same. The hand was really painfull but like the boots it's pretty close from the one of Taihou Buffalo so I was able to get some good references as I have that one.

Speaking about references, I'm really lucky because a really nice collector helped me by providing some great picture of his specimen and with that I was able to get it quite close. Not finish yet as I still have to make the launcher on his hand and also start all the little adjustment with proportions and all that and finish with the technical part like wall thickness and the usual stuff to prepare for the print.

But I wanted to share this first modeling, so here it is.


It's always nice when you model a new thing like that, because you really have to look closely to every detail and discover some stuff that you've never see before, you really learn the character.

Friday, October 5, 2012

The Collection

Today is not a post about some current work but more about all of them displayed together with my Jumbo Machinder collection. I guess it's easier to understand why I'm passionate when you see this.
I would like to make more videos but all ideas require a lot of time so this is a lazy version.


Friday, September 21, 2012

The curse of the lost spear

Double post today as I'm in great shape after the break.

One of my main focus for the moment in my collection, and maybe my main goal is to get a Spartan K5. He's not that hard to get in the villains series, but strangely he always escaped me, and I've already lost a huge amount of auctions trying to get it and ended second on most of them. GRRRR

This villains comes with a spear but he's always missing it, trying to get one with a spear is a real challenge and when it comes with it, the price jumps quite high.

I'm sure I will get one one of these days but I'm sure he's going to miss it too. So I've decide to already start working on the spear. It's a bit close to the idea of the Mach Baron car, doing a replica of the eternal missing accessory.

Here's an image of the modeling in progress. I need to take some dimensions on a real Spartan from a friend to be sure it will shoot and have the right size. Unfortunately my friend doesn't have the spear but at least he got the Spartan with his launcher, lucky guy :))


Thursday, September 20, 2012

Buffalo Launchers

Back from amazing holidays, back to work, back to some Machinder projects.

Here's the final images of the launcher replica I've build for the Taihou Buffalo.
For the K7 and C3 I was not able to do the launcher as accurate as the original mainly because of the fact that the original toys were made of vinyl and the launchers were push into them and stayed in place because of their shape, not possible with a 3D print as it's rigid.

For the Buffalo it was different as they fit on the shoulder, so they can be more accurate for the shape. But the challenge here is that I've never see those launchers in real and I have no idea how they were build and how the spring and the mechanism was put in place.

I've decide to separate the tube in two at the colot connection and design some plug to hold the pieces together, I just have to push the back into the front and turn it by 90° to lock it.

Here's a pict of the whole launcher open.


You can see the connection part. I've decide not to paint it to avoid the fact that it might be difficult to connect after.

And here's two picts on the shoulder of the Buffalo. He's now ready for battle and look way more cool like this.


I still have to do the little red rubber on the back of the lever, but for the moment I'm fine like that and what I'm really happy is that they actually work fine.

Friday, August 24, 2012

Green Ghost C3 ready for battle

Ok ok, so here's a more serious post with the Green Ghost finished. The paint is exactly like I was imaging it. It's honnestly really hard to find the right colors for that guy. I've collect a huge amount of pictures from the original toy and every single specimen is different. Some look blue, some look green, some super green, but strangely the yellow looks consistant almost all the time.

So it's a bit a mix between all those and I've try to find the right balance. The guy who painted it did an amazing job as he was also able to get the subtle light metalic layer on the arms and legs. It seems that on the original, the arms and legs were cast in blue, then sprayed on the hand, feet and articulations with some darker blue, and there was a super soft metalic grey sprayed on them. It's something I didn't manage to do on my Rokuron as I've paint it myself and with spray can, so hard to do that kind of effect. But here the effect looks great.


The gold looks a bit too soft but it's more orange in real. One big change also compare to the Garada, is the varnish used now. For Garada it was supposed to be a semi gloss varnish but it ended up beeing really gloss, so there's a lot of high reflections in it.
I've decide to try another varnish as I've test some stuff for the leg of the Jaguar and it was a good choice. Last one needed also 48 hours to fully cure, and this one only an hour and the result is what I was looking for.


He is now ready to join the whole team and I'm ready to take some rest now as I've been working on both my work and my hobby like a mad man. But before that I will have to build him a little box. 

Edit of 27/10/2012:

I found some picts I did in day light and was thinking that it can be interesting to share as they picture the Green Ghost how it actually looks, and not like on those pictures done with poor light conditions and touch up to raise the levels.
So here they are.


Much much better colors, and I'm crazy about that orange and blue look, just perfect.

Food and toys

Lately I've try to find some Japanese site with robot toys, and I came accross a huge amount of blog from Japanese people with an amazing number of blog post with picture of food, and then sometimes pictures of great robot toys on the same blog. I have strickly no idea why there's so much blog with picture of food and robot and if there's any link between both. Maybe robot toy collectors are crazy with food.

So today, I've decide to follow the flow and post this:


If any Japanese guy end up here and will not understand a word, like me when I go on those blogs, well, at least they might find it normal to have some food picture also here.

Wednesday, August 15, 2012

Golden Boots & Rivets

Double news for today:

First, the leg for the Jaguar is finish, and I can't feel the end of my finger as I've sand too much yesterday evening to finish that thing. I have to say that I've been super slow to start this projects but once I've start it, it was really fun to do.
So, the colors are matching more or less, but it really looks brand new compare to the other leg and the rest of the body.


I was afraid of that, the new feeling compare to the old one, and I was tempted to go for a full repaint of the whole Jaguar. Give him a fresh new look. But after staring at him for an hour this morning, I've decide to keep it like this and avoid falling into the dark side. I'm already super happy that now he can stand normally and I can enjoy him as he should be.


The second news, is that the rivets for the Green Ghost are done. I've never really realise that this little guy had so much rivets, of course you can see that he's got some, but once you have to drill them one by one, it just seems super long. Arms and legs are easy and I knew with the Garada how long it will take, but his little skirt, the body and the head are full of rivets. I still have to fine tune the sanding here and there to be super clean and it will be ready for paint.


That's a bit it for the latest news, normally  the next one will be the finished Green Ghost and after that, back to some virtual work before giving life to something else.

Tuesday, August 14, 2012

Leg Transplant

I was really excited today as I've pick up the 3D print of the Jaguar leg. Excited and anxious that it will fit and have the good size and that the Hasami Jaguar will stand up.
And it was a real pleasure to see that everything was fitting perfectly, and also really strange to see my toy standing up without having something to hold him.

Here's a wide shot to show how it looks, it was a bit a challenge as on the original leg, there's some kind of angle between the whole leg orientation and the connection part. When you look at the body, it's cut straight in the axis but the leg os looking on the exterior. I was afraid that the angle was off and that it was not symetrical, but as you can see it just fit perfectly and looks symetrical.


And here's some closer shots for details. It's more or less good at the connection for the golden part of the leg, seems it match the original. What I'm really happy is that I've see lots of originals not able to stand straight or looking a bit weird, but it's not the case at all with this replacement leg.


Now, it's time for the usual sanding process and there's going to be a lot of work on that one. I have to say that the print quality is not as good as usual, some layer lines are really visible but on weird places, maybe there's some shapes that the lasers don't like. So I guess that a bit of putty will do the trick, and it's my mission for tonight so tomorrow will be the painting.

Sunday, August 5, 2012

Boooooots

Gentlemen, we can rebuild him, we have the technology. We have the capability to make the first bionic toy. Hasami Jaguar will be that toy.

After my video delirium about doing this, I've been in the rush on so many things, but now was the good time to finaly do that missing leg.


So here's the images of the modeling. As usual, I try to be accurate but I'm not sure if it's perfect. From what I've mesure, it should fit. I'm a bit afraid of the painting and beeing able to match the color, but in any case I think it will be far better than the spray can I use to for the moment to make him stand right.

Regarding the other projects, well, things are moving quite fast here, the Green Ghost is already sanded and the rivets will be done this week, and normally the paint is schedule before the end of this month. So, if all this goes as plan the GG will be done, same for the Jaguar's leg and also the Buffalo launchers.

After that, some hollidays to rest and bit and enjoy life, but stay tune for this end of month full of projects.

Thursday, July 19, 2012

The Green Ghost is already there


The room I usually use for my pictures has been converted to a projection room, and there's no more natural light there. So, until I find a new nice set up, here they are in front of a stupid brown background.

Ok, now back to something more serious. Things are moving fast on that one, the print is already done and it came out great.
Now will start the long long sanding session but if things are going as expected, it should be finish is 5 to 6 weeks. Busy summer for me.

So here's the few picts of the 3D prints. As you can see I've print two of them like for Garada, it's going to be the only two I'm building and I'm not even sanding the second one. Doing that on a single one is already enough for me.


Like on Garada, the launcher is a bit too big compare to the original one, but I like those proportions and wanted to use the same files as for Garada, beside that, all the mechanical parts are already there also.

Wednesday, July 11, 2012

Ball launcher

Today, a little post with a side project.

Well actually it's related to the things I'm busy right now but it's not a full character.
I was able to get a Taihou Buffalo for a decent price, unfortunately he didn't had his launchers. Since I've been able to build a working launcher for Garada, doing them for the Buffalo was kind of easy. It's just that I had to adjust the shape for Garada since mine was not in vinyl and then not flexible to put a launcher accurate to the original shape. I've redo the whole pieces but it will work with the same principle but this time it's really accurate.
And knowing that I was able to do that, pushed me to get that Buffalo. I've miss it a few time on auctions and each time it was for complete speciment who ended up after a bloody fight at high prices. So ending with that one for that price, is super cool, and soon he will have all his original fire power....


Thursday, July 5, 2012

Green Ghost C3 color test

Well, I had some time this evening to work on the color test, and I have to say that I was a bit too excited by this new project to wait until this week end to try that :))

So, here's a quick render in my usual test set up with some colors. I didn't spend time on trying to make the little emboss for every rivets, but more trying to find a matching color and have more or less the same airbrush feeling as in the original one.


Hope to be able to make it come into the real world really soon.....

Wednesday, July 4, 2012

Who's coming next?

Well, for those of you familiar with the Villains, you already know this.
Strangely, two bad guys share the same arms and legs, those two guys are Garada K7 (yes, it's him again) and Green Ghost C3. In real, those two had the same molds for the members, that's the reason why their name is not written under the feet like all the other villains.

Since I've spend so much energy on the K7, and I have his arms and legs ready, I've decide to go for the Green Ghost also as there's not that much work to get it done properly.

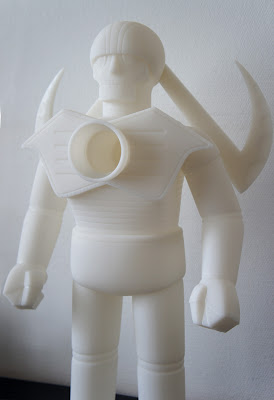
So here's the very first images of the modeling, still a work in progress. Now I will start looking closely at all the pictures I have and try to spot the difference and see how I can enhance the accuracy. I'm already happy since the global feeling is there.


I guess that I will soon test is in my render set up with some colors to have a beter idea, but that for this week end maybe.

Monday, June 25, 2012

Garada K7 final images

So, it's done, here's the final chapter of this long long project. I've done the final details on my replica and he's exactly like I wanted him to be.

Here's a long serie of images in a better quality than that funky vintage look picture. I've almost recreate the effect of the MIB and the pleasure to open it and take it our of the box (ok I've put it there first but who cares :)))

Oh and I swear, no more picture of Garada now, only new projects and he's not involve in it. I can close my fascination door in my brain.


Hope you've enjoy following this project and hope to make more in the future, thanks for all the support from everybody.

Thursday, June 21, 2012

Garada K7 is here.....

Finally finish, here's a vintage pict of it just for fun.
More to come in a few days once I have time to take decent pictures.


Tuesday, June 19, 2012

Work In Progress on the paint

It's good to finally see some colors on that guy. Here's the first images of the painting process, just for my fellow followers , still a few details on the head to add and the varnish to fix everything. Thursday evening it should be dry, I will also get all the metallic parts for the launcher and the spring.

I'm quite happy with the colors, as usual it was a nightmare to try to get the right one and I think that even if it's not 100% accurate, the look is there.

Here's two picts of the members during the paint in the paint cabin. The guy helping for the paint is really talented and all parts are just perfect.


And here's two images of the big guy put together for a check. Just need to finalize the lines on the mouth and the dark red on the eyes.
Still hesitating about doing the stickers on the sickles, I will see once it's finish.


Next post will be the final version with everything, and maybe a little video is things are going as plan :))))

Sunday, June 17, 2012

Rivets and cleaning

The end is closer and closer.

All the rivets are done now, each piece is clean and ready for paint and normally the paint is schedule to start tomorrow. So this is probably one of the last post before the completition of this project.

Here's a few picts with the rivets, it's hard to see of course as the material is quite translucent and those little details are hard to get.
Always tricky to do those rivets since once you touch the surface with the driller, you can't really do anything but drill. Each touch is a rivet and even if I've trace everything before, there's still a few stuff here and there that are not aligned, but I don't really mind as it's probably even more off on the real one.

Ok ok it's another batch of white Garada in front on a white wall, but since he's spending almost all the time in a box is separate pieces, each time I put it together for a check, I can't stop staring at him and take pictures.

I know, you don't really see the rivets here, but this guy is so hypnotic...


Here's a few in high resolution, those tiny rivets are visible.


A few more just for pleasure


And a last one because it's not just always against a white wall. This was drying time after a big wash to remove all the dust from sanding and drilling and to prepare the surface for paintng.


It's the first time the two prints are united again since the print. The other one was sanded and prepared by my friend as I'm not crazy enough to spend double time on the sanding.

It's going to be hard to sleep tonight, tomorrow at 7am I'm on the road for the painting. Can't wait to have that guy finally over.

See you soon for the final chapter.